

Ideal weight bearing flow is established and controlled by the practitioner to ensure that proper plantar contour is achieved, which will eventually be duplicated in the finished orthotic device.
Casting Guides
Casting Guide for Ortho-Foam
|
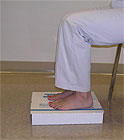
Step 1
Align patient’s body properly. Establish right (90 degree) angle at hip, knee and ankle. Observe feet to ensure proper neutral positioning.
|
|
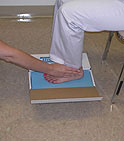
Step 2
See that ankle is neither supinated or pronated.
|
|
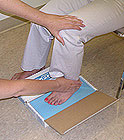
Step 3
Hold ankle in neutral position by supporting the talus to prevent pronation when impression is made. Instruct patient to apply no pressure. Place free hand on patient’s knee and press down, pushing the foot 1” to 1-1/2” into foam. Simultaneously, apply pressure to lateral aspect of foot with other hand.
|
|
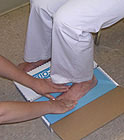
Step 4
Finish impression by pressing in the toes with both hands. Thus, weight bearing flow is simulated – heel to mid foot to toes – while foot is maintained in proper neutral position.
|
|
Step 5
Inspect each impression for defects or an uneven nature of the weight bearing surface or abnormal plantar contour. Repeat procedure with patient’s other foot. Complete prescription/order form and forward convenient mailing box to lab.
|
Casting Guide for STS and Mid-Leg Socks
The STS Ankle and Mid-Leg Impression Socks are intended for use primarily in molding the foot and ankle for making a shoe last or supra-malleolar ankle-foot orthosis. Application suitability is the responsibility of qualified personnel.
PRODUCT CHARAC ERISTICS :
The Ankle and Mid-Leg Impression Socks consist of a stretchy fitted polyester knit sock impregnated with a water curable polyurethane resin. Exposure of the material to moisture or water initiates a chemical reaction that causes the sock to become rigid. Finished molds are strong, Iight weight and accurately replicate the foot and ankle shape.
PRODUCT STORAGE:
One molding sock is packaged in each sealed foil pouch. Care should be taken to avoid puncturing the pouch. This will cause the sock to harden prematurely in the package. The product should be stored in a cool, dry place. Extremes of temperature and humidity should be avoided.
Each pouch should be gently squeezed prior to opening to check suitability for application. The material should feel soft and pliable. For optimum performance, rotate stock.
Precautions:
Caution:
It is very important to smooth out all wrinkles and not overlap the material before it cures. Excessive heat caused by overlapping may cause irritation, discomfort or possible thermal injury to patient. Always use room temperature water (68-70º F) that is cool to touch for the immersion of the Ankle and Mid-Leg Sock.
- The polyurethane resin in the sock will adhere to unprotected skin and clothing. Protective latex examination or surgical gloves should be worn while handling the material. Care should be exercised to avoid contacting unprotected skin areas during application by using a plastic bag of appropriate length.
- Swabbing lightly immediately with alcohol may help in removing resin from the skin.
- The patient will be able to feel some heat during the process, but should not find it “uncomfortable”. The patient should be instructed to report any irritation or “burning” sensations. patients with neuropathy may not feel any heat sensation. If the patient complains of the heat, the impression material should be removed immediately and the cause of the complaint determined before re-starting the process.
Construction of a Mold:
It is recommended that the foot maintain a 90º angle to the leg throughout the entire casting process to avoid excessive wrinkling at the anterior ankle area.
- Place the protective plastic cutting strip over the foot (rounded end toward toes) and anterior aspect of the ankle/lower leg starting just behind the cleavage between the first and second toes. Hold the strip in place using three or four strips of 3/4″ paper or masking tape. Use two plastic strips — one on top of the other – if an electric cast cutter is used for removal for added protection.
- Place the channel tube directly over the cutting strip and tape in place with additional 3-4 strip of paper tape.
- Slip the protective plastic baggie over the foot, ankle and leg. A nylon stocking can be placed over the plastic baggie for a smoother interior surface.
Examining gloves must be worn while applying the sock since
the resin in the material will transfer and adhere to the skin. - Remove the sock from the pouch and completely unfold. Activate the resin by dipping the sock in room temperature water (68-70º F) for 5 – 10 seconds, squeezing the sock several times while submerged. (Note: Using colder water increases working time.)
- Orient the sock so that the stitched toe end is hanging downward and facing you. Gather the entire sock up from the open proximal end to the distal colored toe stitch line. This will facilitate application. Apply the sock to the foot and ankle. (Make certain not to force the sock to the foot in order to avoid contraction of the toes.) Gently stretch out wrinkles as the sock is applied over the foot and up the leg. Be certain that there is no overlapping of material!!!!
- With the sock in place and pulled up over the ankle, wet gloves and massage the sock over the foot and ankle, working from distal to proximal to smooth out any additional wrinkles. Add additional water to your gloves as necessary if the resin becomes tacky. Make certain the sock is molded well over the channel tube, instep area and malleoli. While the sock is still soft and pliable, use the specially designed STS removal scissors to make a small transverse cut at the distal end of the channel tube. This will create a small hole that will be used to insert the removal scissors. After approximately one minute, the resin will begin to “foam” slightly and become warmer. This is normal. Immediately dip gloves in water again and continue to massage the cast during the foaming process. The resin will become creamy. Continue to dip gloves in water and massage the creamy resin to obtain a “glass smooth finish. The wetter the gloves , the more slippery the resin becomes so keep dipping the gloves in the water as necessary, to produce a very smooth and strong finished mold.
- When the foaming stops, place the patient’s foot and leg in the desired position (e.g. neutral suspension, semi-weight bearing) depending on your orthotic manufacturer’s specifications. Allow the resin to harden.
Removal Instructions
REMOVAL INSTRUCTIONS:
- Tap the sock to determine if there are any uncured “soft spots”. Apply more water (with gloved hands) and allow additional time to harden if necessary.
- Remove the channel tube by pulling on the exposed proximal end holding the cutting strip in place do NOT remove the cutting strip.
- Direct the scissors toward the ankle and insert the lower scissors jaw into the hole previously created. Working from distal to proximal, cut the sock upward along the entire channel.Keep the cut line over the underlying protective strip. Next, reverse direction and cut the sock toward the toes. The cut line should extend to the colored stitch line and be placed between the 1st and 2nd toes. The STS letter opener can also be used to cut the hardened sock. USE MINIMAL PRESSURE IF USING AN ELECTRIC CAST CUTTER TO AVOID CUTTING THROUGH THE UNDERLYING PROTECTIVE CUTTING STRIP.
- Spread apart the cut line and carefully remove it from the foot. Have the patient gently wiggle toes to facilitate removal.
- Carefully remove the plastic liner from the cast by first pulling it toward the toes through the cut line and then pulling away from the toes toward the heel and leg portion of the cast.